Easiest Way To Install Moq for Unity

Unit testing is a great tool to help you develop great games, and having the right frameworks in Unity makes that possible. Moq is a popular mocking library for C# that allows you to simplify your unit tests and mock behaviors of your dependencies. It can be a little tricky to install for Unity, so in this tutorial I’ll show you the easiest way to install Moq in your project.
Step 1: Install NuGet for Unity
NuGet is a package manager for .NET that makes it easy to get and update your dependencies.
Install NuGet by downloading their latest Unity package release from their github. You can also install it as a git dependency in the Unity package manager.
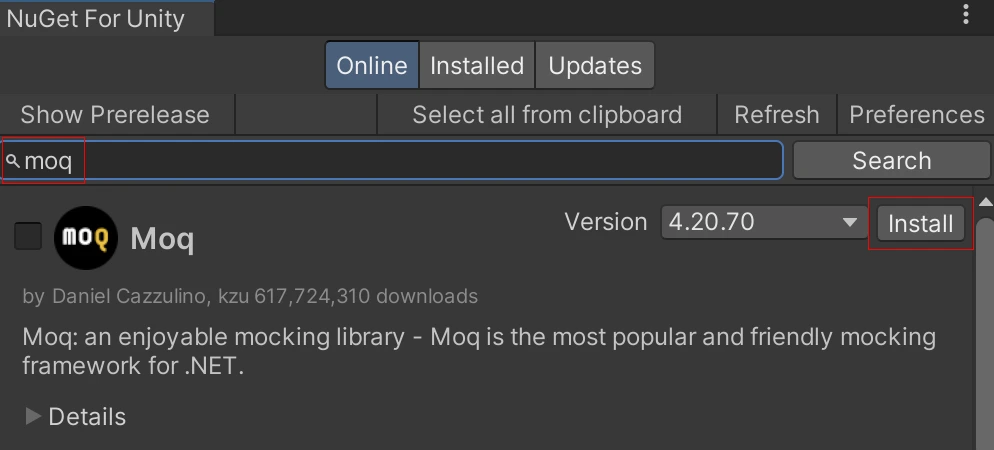
Once you have NuGet setup, open it in Unity by navigating in the menu bar to NuGet -> Manage NuGet Packages. Search for Moq and hit install.
Step 2: Use Moq in your tests
After installing Moq via NuGet it should be working right away. I won’t go into details on how to use moq or mocking in your unit tests, but the gist of it is that it allows you to mock your class & method’s dependencies so that you can focus on strictly testing the logic under the unit test. For example, if you have a method that depends on a database a mock database would allow you to quickly setup the database dependency have return whatever values you need to execute your test. Without a mocking framework your tests would need to have an actual database to connect to, real data to retrieve from the database, etc.
public interface IPathMap {
  public List<PathNode> FindPath(Vector3Int start, Vector3Int end);
}


// unit test for the Supplier.cs class that depends on IPathMap

using Moq;
using NUnit.Framework;

private Mock<IPathMap> _pathMap;
private Supplier _supplier;

[SetUp]
public void Setup()
{
  _pathMap = new Mock<IPathMap>();
  _pathMap.Setup(p => p.FindPath(It.IsAny<Vector3Int>(), It.IsAny<Vector3Int>()))
    .Returns(new List<PathNode> { new() });

  _supplier = new Supplier(_pathMap.Object);
}
In this example we create a Mock for the IPathMap interface. The interface has one method, FindPath and we setup the mock to return an empty List<PathNode> for any inputs. The mock could be setup to return different values for different inputs as well. We then use the mocked IPathMap by passing it into the constructor for Supplier.
Conclusion
As you can see, mocking is a powerful tool to have when unit testing your Unity game. It simplifies a lot of the setup for writing tests and allows you to focus on validating each classes underlying code. Of course, it’s still good to have more comprehensive tests (integration / functional) tests but I think unit tests are the building blocks to having well tested code.
Check out my other tutorial if you’re interested in learning more about Unit Testing in Unity!
If you’re interested in more ways to do automated testing and validation for your game, I highly recommend considering the Odin Validator asset as well. It allows you to run validations on components, scenes, prefabs, and scriptable objects. It also scans all your other Unity resources like materials, textures, etc to look for any issues!

Jonathan
Hey there, I’m Jon! I love landscape photography which is why I travel all the time! On my blog I’ll share all the best spots for epic sunsets and sunrises as well as some photography tips and tricks. I also have a interest in game design so you’ll find the occasional post about that too. Thanks for visiting!


Thank you for this. I’d just like to add that after installing Moq via Nuget, I needed to add the mock.dll reference to my Assembly Definition so I could use it my test scripts.
Thanks @Alankar, your comment was helpful